Wednesday, April 8, 2015

New Home

Dear All,

      Cest Si Bon MD is moving to a new space - please follow me to my new home at www.cestsibonmd.com, and let me know what you think! Feedback is always welcome.

Thanks for reading,

R

Tuesday, March 24, 2015

More Or Less Adventure?

I've been away, mentally, for the last couple of months. 
I've discovered the funny thing that no one tells you - that figuring out your first job after training will be acutely stressful and emotionally trying. Well not exactly - of course I knew it would be stressful, but the magnitude was unexpected. In retrospect, I should have seen it coming. The lengthy on-ramp to a career in medicine allows you to have tunnel vision, to some extent. For the longest time, the next step ahead of you is rather obvious - med school, residency, fellowship. 

One day, somewhere in your last year of fellowship, you realize that you've just about arrived at a yawning chasm - there is no obvious next step, and you really have to decide what you're going to do with your life. Ok - perhaps a little bit dramatic, but needless to say, you can't have everything, and choosing your first job  calls into question what's important to you, and where you really want to be going (personally and professionally). You know, the Big Life Questions that you must answer for yourself, as honestly as possible.

Let's just say, you will miss the match. 

This decision making process, although difficult, is something I'm glad that we went through. It reaffirmed our priorities and refined our plans for the next several years. I also met some wonderful people. 

For a representation of the experience, I'll just share this photo of a hemlock maze from a sculpture garden in Windsor, VT, aptly named the Path of Life. The maze represents the beginning of childhood and exploration.


And a special thanks to Braeburn Siberians for allowing us to spend an afternoon with an incredible team of huskies!


I am deeply thankful for my friends, family, and mentors who have helped me so much in this process. Thanks for reading.


-R

Monday, January 19, 2015

Banana Bread Sandwiches


I love bananas. For that reason, the hardest part about making banana bread is simply having any leftover overripe bananas (breakfast is frequently a banana with a peanut butter schmear).  On the rare occasion that I do have overripe bananas sitting around, they go into banana bread. I'm not sure there's anything better than the smell of warm banana bread studded with walnuts - there's a reason why it's a classic, for sure. One of my favorite things is making banana bread when I'm visiting Mom over the holidays - she always has some old bananas lying around. I'm also a big proponent of not wasting food, and nothing is better than taking some ugly ol' bananas and transforming them into a delicious quick bread. Quick bread is the only way to go. Because I'm not sitting around waiting for dough to rise. Just...no. Not ever (sadly, this is the only thing standing between me and cinnamon buns).

 This banana bread is lightened up a little bit, with greek yogurt substituted in for half of the butter. I also used a half/half mixture of whole wheat and white flour. You can enjoy this banana bread however you want - plain, in sandwich form, with peanut butter, jam....maybe nutella.... It doesn't really matter; it's delicious no matter how you cut it. 

Banana Bread
Makes one 9x5 loaf

Ingredients

4 tbsp butter, melted

1/2 cup greek yogurt (2%)

1/2 cup granulated sugar

2 eggs, beaten

3 large overripe bananas, smashed (the browner the better)

3/4 cup whole wheat flour

3/4 cup white flour

1 tsp baking soda

1/2 tsp salt

1 tsp vanilla

1/2 tsp cinnamon

1/2 cup chopped walnuts (optional)


Directions

1. Preheat oven to 350F. 

2. Combine all ingredients except flour and walnuts. Stir until well-combined

3. Add flour to wet ingredients, gently stir in until just combined. Do not over-mix

4. Pour batter into an oiled 9x5 loaf pan. Bake for 50-60 minutes, or until an inserted toothpick comes out clean

5. Cool for 20 minutes. Slice and enjoy


As always, thanks for reading.

-R


Thursday, January 1, 2015

Chunky Chicken Noodle & Dill Soup


HAPPY NEW YEAR!

 Since Christmas, the temperature has dropped back to seasonally appropriate face-numbing cold. We had a wonderful Christmas in New York, with lots and lots of delicious everything (thx K/JB!) I  stumbled across this chicken soup recipe when Zite offered me "The Most Important Recipes You Should Master Before You Turn 30". I'm not sure how you decide what recipes you need to have under your belt by age X, but nonetheless, I was intrigued. Perusing the list, some recipes were less exciting (Potatoes Dauphinoise?), some more (I'm looking at you, Beef Bourguignon).

I settled on  a tried and true standard; a chicken soup that just looked too good to pass up. I mean, chicken soup is not really exciting, but it's the food equivalent to your best pair of sweatpants. Plus my previous soup attempts have generally proved disappointing (mostly chili, mostly blah), so I thought it was time to attempt another hearty winter soup. I'm glad I tried again. I love this recipe because of its zest - the chicken is ever so slightly spicy, and the dill and lemon juice really brighten everything up. I modified the original recipe, cooking the chicken stovetop instead of roasting it, and cutting back the sodium. I also used dried dill. If you want to warm your belly and soul, don't miss this soup!


Chicken Noodle & Dill Soup


Ingredients

1 lb skinless boneless chicken breast tenders

4 tbsp olive oil, divided

1 tsp garlic powder

1 tsp cumin

1/2 tsp chili powder

1/2 tsp cayenne pepper

1/2 tsp dried oregano

3/4 tsp salt

3/4 tsp black pepper

1 large onion, diced

3 large carrots, sliced

3 large stalks celery, chopped

5 tsp garlic, minced

Two 14-oz cans of chicken stock (1 sodium reduced, 1 regular)

4 cups water

2 cups pasta (I used fusilli)

Juice of 1 lemon

1/3 cup dried dill (or fresh dill to your taste)


Directions

1. Heat 2 tbsp olive oil over medium heat (4). Prepare onion, carrot, and celery


2. Add onion, carrot, and celery to heated oil and cook for 8-9 minutes stirring occasionally

3. While vegetables cook, mix garlic, cumin, chili powder, cayenne, oregano, salt, and pepper in a small bowl. Gently coat chicken breast pieces with the spices

4. Heat 2 tbsp of oil in a medium sized pan, over medium heat (4). Cook chicken breast for ~5-7 minutes, or until done, depending on the thickness. Allow chicken to brown slightly before flipping; this will develop the flavor more


4. Return to the vegetables. Add garlic, and cook for 1 minute. Add chicken stock and water, then turn to high heat and let soup come to a boil.

5. Once boiling, reduce heat to medium low, and stir in pasta. Cook for 10-15 minutes, or until pasta is al dente. While pasta cooks, shred the chicken.


6. Combine lemon juice, dill, and cooked chicken with the soup. Adjust seasonings to taste, and enjoy immediately


Thanks for reading. Wishing you the best in 2015!

-R


Thursday, December 18, 2014

Cranberry Oat Bars


Hello December...except it's almost over. I'm finally sharing these cranberry oat bars, which I made several weeks ago. Buttery and with tart cranberries, they're pretty holiday-appropriate.  I returned from NYC mid-week battling a rather nasty cold, so this will be short.

 I'm looking forward to some down time over the next week. Hopefully, I can muster up the energy to make something new. Now it's off to bed before an early tumor board tomorrow...

Warm wishes, and I hope you are enjoying the holidays!


Cranberry Oat Bars
Recipe adapted from here

Ingredients

Crust:

1 cup all purpose flour

4 tbsp salted butter, melted

1 cup quick cooking or old fashioned oats

1/4 tsp salt

1/4 tsp baking soda

1/4 cup brown sugar

3 tbsp orange juice (or apple cider)


Filling:

1 cup dried cranberries

3/4 cup greek yogurt

1/4 cup granulated sugar

2 tbsp all purpose flour

2 tsp vanilla extract

1 large egg white, lightly beaten


Directions

1. Preheat oven to 325F

2. Combine crust ingredients and mix well; mixture will be crumbly. Reserve 1/2 cup oat mixture in a small bowl

3. Lightly oil a 11x7 inch pan. Press oat mixture firmly into pan.

4. Combine filling ingredients. Spread evenly over crust

5. Top with reserved 1/2 cup of the oat mixture

6. Bake for 40 minutes until edges are golden

7. Cool, cut into squares, and enjoy


These will keep well in the fridge for a week or so. 

Stay warm, and wash your hands.

-R


Sunday, November 23, 2014

Zion National Park


"There are no words that can tell the hidden spirit of the wilderness, that can reveal its mystery, its melancholy and its charm" 

                                                                                -T. Roosevelt

We're enjoying a few days exploring Zion National Park in Southern Utah. There's something about the impartial, colossal red white and cream-swirled cliffs that allow you to just be, to stop worrying. Look at the weathered sandstone, and time stares back at you - millions of years all at once. It's hard to get caught up in the day to day when we're reminded of how small we are in this beautiful place.  It's as if somehow, your mind wanders, expands and fills up the vastness, freeing you from individuality. You cease to be you, you just are, and it's profoundly refreshing. 

Home is a quiet ranch with a resident herd of buffalo, adding to the sense of calm and serenity.  I just wanted to share a bit of the beauty and peace, in hopes that you enjoy it as much as we do.


Returning from the hike to Angel's Landing -  across the narrow cliff ledge in the middle


Our home for a few days:


Thanks for reading. Wishing you a happy Thanksgiving!

-R

Friday, November 14, 2014

Roasted Acorn Squash + Rosemary & Thyme Scented Beef


This recipe is inspired by all the little squirrels outside, with their frenzied collecting of acorns in preparation for winter.  Every time we're out for a walk, you can't miss them, jumping around like they're on some amphetamine-fueled scavenger hunt for nuts. I reluctantly admit that this time of year is ok, but come on, do we really need to get rid of Daylight Savings Time? Isn't this the time we need daylight most?!

In keeping with fall, I've been roasting a lot of apples, squash and pumpkin. There's something warming and satisfying about bringing the outdoors inside; the leaves are a hundred shades of candy-red, orange, and rich brown, mirroring bright red apples, orange squash, and let's not forget - the omnipresent pumpkin pie. Last week, I couldn't resist buying two beautiful dark green acorn squashes with their irreverent stripes of orange, and on a whim, decided to combine them with herb scented beef.  The herbs prompted singing of "parsley sage, rosemary and thyme" on repeat by my husband (Scarborough Fair, I later realized). Also, when presented with the above meal, he instantly homogenized it, smashing the beef into the squash, until it became a squash/beef mash.  It's one of his lovable quirks, the homogenizing. 

 This is a very easy recipe, and you can prepare the squash and beef separately, if you're short on time (I prepped them in two stages). This hearty squash supper is great for a cold fall evening. Hope you'll enjoy this! 


Roasted Acorn Squash + Rosemary & Thyme Scented Beef


Ingredients

2 acorn squashes, halved

olive oil 

brown sugar

cinnamon

nutmeg

1 lb lean ground beef 

1/2 large onion, chopped

1 tbsp minced garlic

Worcestershire sauce

Rosemary & Thyme 


Directions

1. Preheat oven to 400F

2. Halve acorn squashes. Scoop out seeds and brush with olive oil. Dust lightly with brown sugar, cinnamon, and nutmeg

3. Bake for ~40 minutes or until squash is fork tender. Remove from oven and set aside

4. In a medium sized pan, heat a a few tablespoons of olive oil over low-medium heat, with garlic. Once garlic is fragrant, add onions, beef, herbs (liberally), and a dash of Worcestershire sauce. Cook until beef is cooked through

5. Ladle beef into squash halves and serve immediately


What are your favorite fall foods?

Thanks for reading!

-R

Thursday, October 30, 2014

Slow Cooker Meatballs


The days are getting shorter, the weather is getting nippy, and there's just something about this time of year that makes me want to snuggle up at home - and eat hearty food. It's only a matter of time before the Christmas music plays 24/7, and I run out of Pandora hours (think that's impossible? so did I, until my H exhausted my account a few years ago!).
Budget carefully.

Maybe it's the impending cold of winter or the musing that comes with the end of a year, but recently, I've been reflecting on all the wonderful and horrible uncertainties in life that are stark reality when you work in medicine. I've come to wonder: are we all on some sort of weird vacation-of-uncertain-duration on this Earth? And if so, are you making the most of your vacation time, whether that means doing nothing, or doing everything?


Slow Cooker Meatballs


Ingredients

1 lb ground beef (85% lean)

1/4 cup plain bread crumbs

1 egg

1/2 large white onion, finely chopped

1 tsp garlic

3 tbsp oregano (divided - 1 tbsp for the meatballs, 2 tbsp for the sauce)

1/4 cup parmesan cheese + additional for stirring into sauce

1/2 tsp salt

1/2 tsp  pepper

One 28 oz can of crushed or whole tomatoes *

*Use 1 1/2 large cans if you want extra saucy meatballs


Directions

1. Combine all but the tomatoes and reserved oregano in a large bowl and mix until combined

2. Heat olive oil in a large saucepan over medium heat. Form meat into approximately 2 tbsp sized meatballs

3. Brown meatballs evenly in the saucepan

4. Add meatballs to slow cooker. Pour tomatoes + 2 tbsp oregano over the meatballs

5. Set slow cooker to low, cook for 8-10 hours

6. Stir in up to 1/4 cup parmesan cheese to taste; add salt and pepper to taste. Enjoy!


In other news,
New sisters

A visit to the winery 


Mystic Seaport

Thanks for reading!

-R


Tuesday, October 14, 2014

Our Favorite Pumpkin Pie


Since it's officially pumpkin pie season (for us, September through Thanksgiving, and not a day later), I think it's about time I share our favorite pumpkin pie. The season has gotten off to a slow start this year, so we're making up for lost time. And I mean really  moving. We've made this twice in the past two weeks, and each time, it's like....what pumpkin pie?? It's gone before you know it. Even then, I still manage to deplete our whipped cream supply before all the pie is gone. Whipped cream to pie ratio is always low, no matter how good the pie is. Eating whipped cream plain is so worth it, incredulous stares from hubby be damned. 

 I love, love love this pie because it only takes 5 minutes to put together. Pop it in the oven, and an hour later, there you have it: not-too-sweet, sweet, cinnamon-y and clove-y pumpkin pie. The whole room will smell like Fall, and you will want to rake leaves or something. I adapted the recipe from Cooking Light, cutting back on the sugar even further and upping the spice quotient. The pie is still subtly sweet, and going light on sugar helps the spices shine through more. Give this pie a whirl - I hope you love it as much as we do! 


Our Favorite Pumpkin Pie

Ingredients

one 15 oz. can plain pumpkin

one 12 oz can 2% evaporated milk

1/2 cup brown sugar (not packed)

2 large egg whites

1 large egg

2 tsp pumpkin pie spice

1/4 tsp salt

1 pre-made graham cracker crust


Directions

1. Preheat oven to 425F

2. Combine all ingredients in a large bowl. Stir until thoroughly combined

3. Pour into graham cracker crust

4. Bake at 425F for 10 minutes

5. Reduce heat to 350F and bake for additional 40-50 minutes until pie is set and evenly browned 

6. Cool to room temperature & enjoy


I hope you enjoy this pie as much as we do. It's a repeat year after year for us. Let me know how it turns out for you.  As always, thanks for stopping by!

-R


Sunday, October 5, 2014

Spinach Pappardelle with Chard & Italian Sausage


I'm back! We have been traveling the last couple of weekends - to NYC to catch up with a dear friend, and to Boston to celebrate my brother's engagement and to visit my Dad. In between, we've both been pretty consumed with work-related things: abstract deadlines, and thinking about what to do after I finish fellowship this year. It's getting real.  

I should also mention that we blazed through the 14 hour Roosevelt series on PBS - hands down, one of the best documentaries we've seen, and definitely partly to blame for long absence from here.  If you haven't seen the series, or don't even really have an interest in American history that much, watch it anyway. The upbringings and the various psychological hurdles that TR, FDR, and Eleanor had to face are worth it alone, purely from a humanistic aspect. One of my favorite quotes by TR (who essentially spent a lifetime outrunning childhood illness, "depressive tendencies" and awful twists of fate (he lost is mother and young wife on the same day): 

"Get action. Do things; be sane, don't fritter away your time; create, act, take a place wherever you are and be somebody; get action."

You can't beat that. 

We've also been busy planning our vacations for this year - starting with a visit to Zion and Bryce Canyon in November (in combination with Thanksgiving at home). Possibly Australia in March?? Lots and lots of planning - thankfully all for a good things. All of this has meant ultra simple meals (throwing canned salmon into a stir fry, slow cooker chicken galore....), and little energy to document the results. So instead, I'll go back in time a bit. This pappardelle dish is one I've been wanting to share for quite some time now. It popped into my head this morning when the Fall morning cold nipped me in the butt: Swiss chard, a classic winter vegetables. Our spinach pappardelle was a gift from my in-laws. You can probably find it in a lot of specialty pasta / olive oil stores, but if you can't, regular pappardelle should work just fine too. This recipe is so simple, so I'll just leave you with a loose outline here: 

Spinach Pappardelle with Chard & Italian Sausage
makes as much or as little as you like


Ingredients

Pappardelle (spinach or regular)

Italian sausage (a few links, depending on how much you want to make)

Small bunch of swiss chard, chopped

Olive oil

Parmigiano reggiano cheese


Directions

1. Heat a salted pot of water to a boil. Cook pappardelle according to instructions, until al dente. Drain and toss with olive oil.

2. While water is heating, broil or cook sausage until done (I think mine took 15 minutes stove top)

3. Remove sausage from pan and cut into bite sized pieces. Add a bit of olive oil to the pan, return to heat, and add chard. Cook until wilted

4.  Combine pappardelle, sausage, and chard. Top with a dusting of parmigiano and enjoy! 


Thanks for reading - I hope you're enjoying Fall so far! 

-R


Wednesday, September 10, 2014

Basil & Grapefruit Shortbread


Happy unofficial Fall! (It's not really Fall until September 23, but who's counting?) Starbucks clearly isn't, seeing that it debuted its Pumpkin Spice Latte in August this year...?!

In preparation for hibernation, it's time to enjoy some buttery treats. This is an quick shortbread that uses white whole wheat flour. These shortbread cookies are deliciously zesty and light (basil and grapefruit) and substantial (hello butter*) at the same time; they are particularly excellent companions to a steaming mug of coffee or tea.

* reasons why we love organic butter here

Basil & Grapefruit Shortbread
Makes approximately 1.5 doz cookies

Ingredients

Zest of 1 grapefruit (~1 tbsp)

2 tbsp fresh grapefruit juice 

8 tbsp salted organic butter, room temperature

1/4 cup granulated sugar

1 tsp vanilla extract

1/4 tsp salt

1 1/2 cups white whole wheat flour


Directions

1. Preheat oven to 325F

2. Combine grapefruit juice, zest, butter, and sugar in a mixing bowl. Mix on medium speed for 2-3 minutes until well blended

3. Stir in vanilla extract and salt

4. Gently add flour, mixing until just combined (do not over-mix)

5. Roll  dough out into a log; cover and freeze for 15-20 minutes

6. Cut dough into 1/4 inch thick discs; space evenly on a baking sheet

7. Bake for 7-10 minutes or until crisp 

 We have been soaking up the outdoors as much as possible - most recently, we spent a weekend at a beautiful bed and breakfast in the Hudson River Valley over Labor Day Weekend. Although it was an overcast and rainy weekend, we managed to squeeze some kayaking in. There's something so relaxing and peaceful about just being on the water, watching the trains chug by like little model cars, weaving their way around the base of the hills. 


Thanks for stopping by - I hope you're enjoying the beginnings of crisp mornings and cool nights!  

-R


Wednesday, August 27, 2014

Summer Tomato Polenta Tartlets


It's hard to believe it's nearly September - and that it's been 3 weeks since my last post here. We've been so busy the past 3 weekends - between traveling and call - that the time has literally flown by. Last weekend, we were both on call; the weekend before, we made a quick trip to NYC to celebrate my father's hard work. We are so happy for him and so incredibly proud of his accomplishments. 

So, as summer's last hurrah is here, I'm posting this tomato recipe that makes use of the best of the season - fresh tomatoes. This is, like always, very easy to put together. All you need is to cook the polenta (generally 3 cups of water for 1 cup of dry polenta) and slice some tomatoes and basil. That's the extent of the prep work. 

I'm hoping to make these tartlets more time before these pretty bright red orbs give way to the yellow and orange hues of fall squash, although I imagine polenta would be a great partner for fall vegetables too. As a matter of fact, I have a giant kabocha squash sitting on my countertop already. I'm not sure just how to attack it (have you seen kabochas? scary looking things with thick skin...I'll have to ask my Dad, who swears by kabocha almost every morning). I'll report back on the kabocha soon...

Summer Tomato Polenta Tartlets

Ingredients
makes 12 tartlets

1 cup dry polenta

3 cups water

1/2 cup grated pecorino romano cheese

1 tsp salt

1/2 tsp pepper

1/2 pint cherry tomatoes, halved

1 tbsp basil, chopped (plus several more sliced leaves for topping)

crumbled chèvre (or cheese of your choice)


Directions

1. In a medium pot, bring 3 cups of water to a boil over high heat

2. Add polenta gradually while stirring constantly. Turn down heat to medium-low

3. Whisk in grated pecorino, salt, and chopped basil. Continue to stir until polenta thickens to the point where it begins to pull away from the sides of the pot. Adjust seasonings to taste and remove polenta from heat

4. Preheat broiler on low. Lightly oil a standard muffin pan

5. Pour approximately 1/4 cup polenta in each tin. Top with crumbled chèvre (or cheese of your choice) and several tomato halves

6. Broil for approximately 10 minutes, until tomatoes begin to pucker (watch to make sure there's no burning, since broiler heat can vary)

7. Remove tartlets from oven; allow to cool for 10-15 minutes (do not try to scoop them out immediately; they will not hold their shape until they cool down)

8. Remove from the pan, garnish with sliced basil leaves and enjoy!


I hope you have a wonderful Labor Day Weekend. I'm excited for fall (aka pumpkin pie season in this family)!


Wednesday, August 6, 2014

GF Blueberry Oat Bars


O.M.G. (!), this is probably one of my new favorite recipes. On top of being delicious and packed with filling oats, blueberries, and nuts, you can whip this up well before the oven is done preheating. Yes - before the "beep beep beep".  In fact, it's so fast that I've made it in the mornings before work, had a bar for breakfast, and packed 2 bars for an afternoon snack before leaving the house. I've made these gluten free blueberry oat bars at least 2-3 times within the last 2 weeks, and my husband has tried ...zero... (shameful, I know). As I write this, another batch is baking in the oven. I'm hoping he hops on these fast tomorrow morning before they're all gone...

Summer is drawing to a close, but this recipe is great - you can make these filling bars year round. Frozen blueberries bake up perfectly into juicy, blue pillows nestled in a soft, spiced, oat-y background. The hard part is believing that these are actually good for you (and gluten free too, if you please)! 

These blueberry bars are the perfect grab-and-go breakfast/snack; they are essentially portable oatmeal (+ an egg). Protein and fiber in the oats, berries, milk...nuts...egg....wait - everything, will easily keep you satiated until lunch time. 

Blueberry Oat Bars
Makes ~9 bars (3 x 3 in each)
Adapted from Iowa Girl Eats

 Ingredients:

1 1/2 cups oats (quick or old fashioned will work)

1/2 cup chopped nuts (optional)

1 cup fresh or frozen blueberries

1/4 cup brown sugar

1 tsp salt

1 tsp cinnamon

1/2 tsp coriander (optional)

1 1/4 cups whole milk (you could probably also use 2%)

1 egg

2 tsp vanilla


Directions:

1. Preheat oven to 350F. Lightly oil a 12 x 9 in. pan

2. Combine all ingredients but vanilla and milk in a large mixing bowl. Add vanilla and milk last; stir to combine (batter will be very liquid - don't worry, it will firm up in the oven)

3. Pour batter into pan; rearrange blueberries evenly 

4. Bake for 30 minutes

5. Remove from oven; let cool, and cut into squares (approximately 9), and enjoy! 


I hope you enjoy these soft, chewy bars as much as we (okay, just I) have. Store the bars in the refrigerator; they will keep for 3-5 days, but I doubt they'll last that long.

Any suggestions for mix-ins are welcome - I'm thinking about coconut?

Thanks for stopping by! Let me know what you think of these (and what mix-ins you would add)! 

-R

Sunday, August 3, 2014

Mini Ice Cream Sandwiches


Last week, I found out that I passed the Anatomic and Clinical Pathology boards - after all these years of training, I'm finally board certified! This was quickly followed by the humbling realization that although I am now authorized to sign out cases on my own, I still have so much to learn. I have to believe that the first few years when I sign out independently is when I will learn the most. In some ways, this whole process is like learning how to ride a bike. My training wheels are just about coming off....there's no going back! 

My Dad likes to remember how he tricked me into riding my bike without the training wheels. At first I was terrified - I insisted that he stand right behind me as I rode away. He complied the first few times, and then did "phantom steps". He stayed put while I rode away, stomping loudly so I thought he was right behind me. Eventually, I realized he wasn't behind me - and I realized I knew how to ride a bike! Residency is a similar process - although I'm still in the wobbly "I wish I had my wheels" stage. All joking aside though, I am profoundly grateful for the support of my family, friends, and mentors for helping me reach this point. You have helped me through my most difficult times with encouragement and love, and I could not ask for a better group of people to go through life with. 

  To celebrate, my husband took me to  Zinc downtown, which offered a delicious summer dinner with lots of juicy, sweet peaches. It's only a matter of time before we head to our local orchard to nab some peaches of our own! In addition to summer fruits, we've been on an ice cream kick lately - who doesn't love ice cream in the summer? (or fall? or winter? or spring?) 

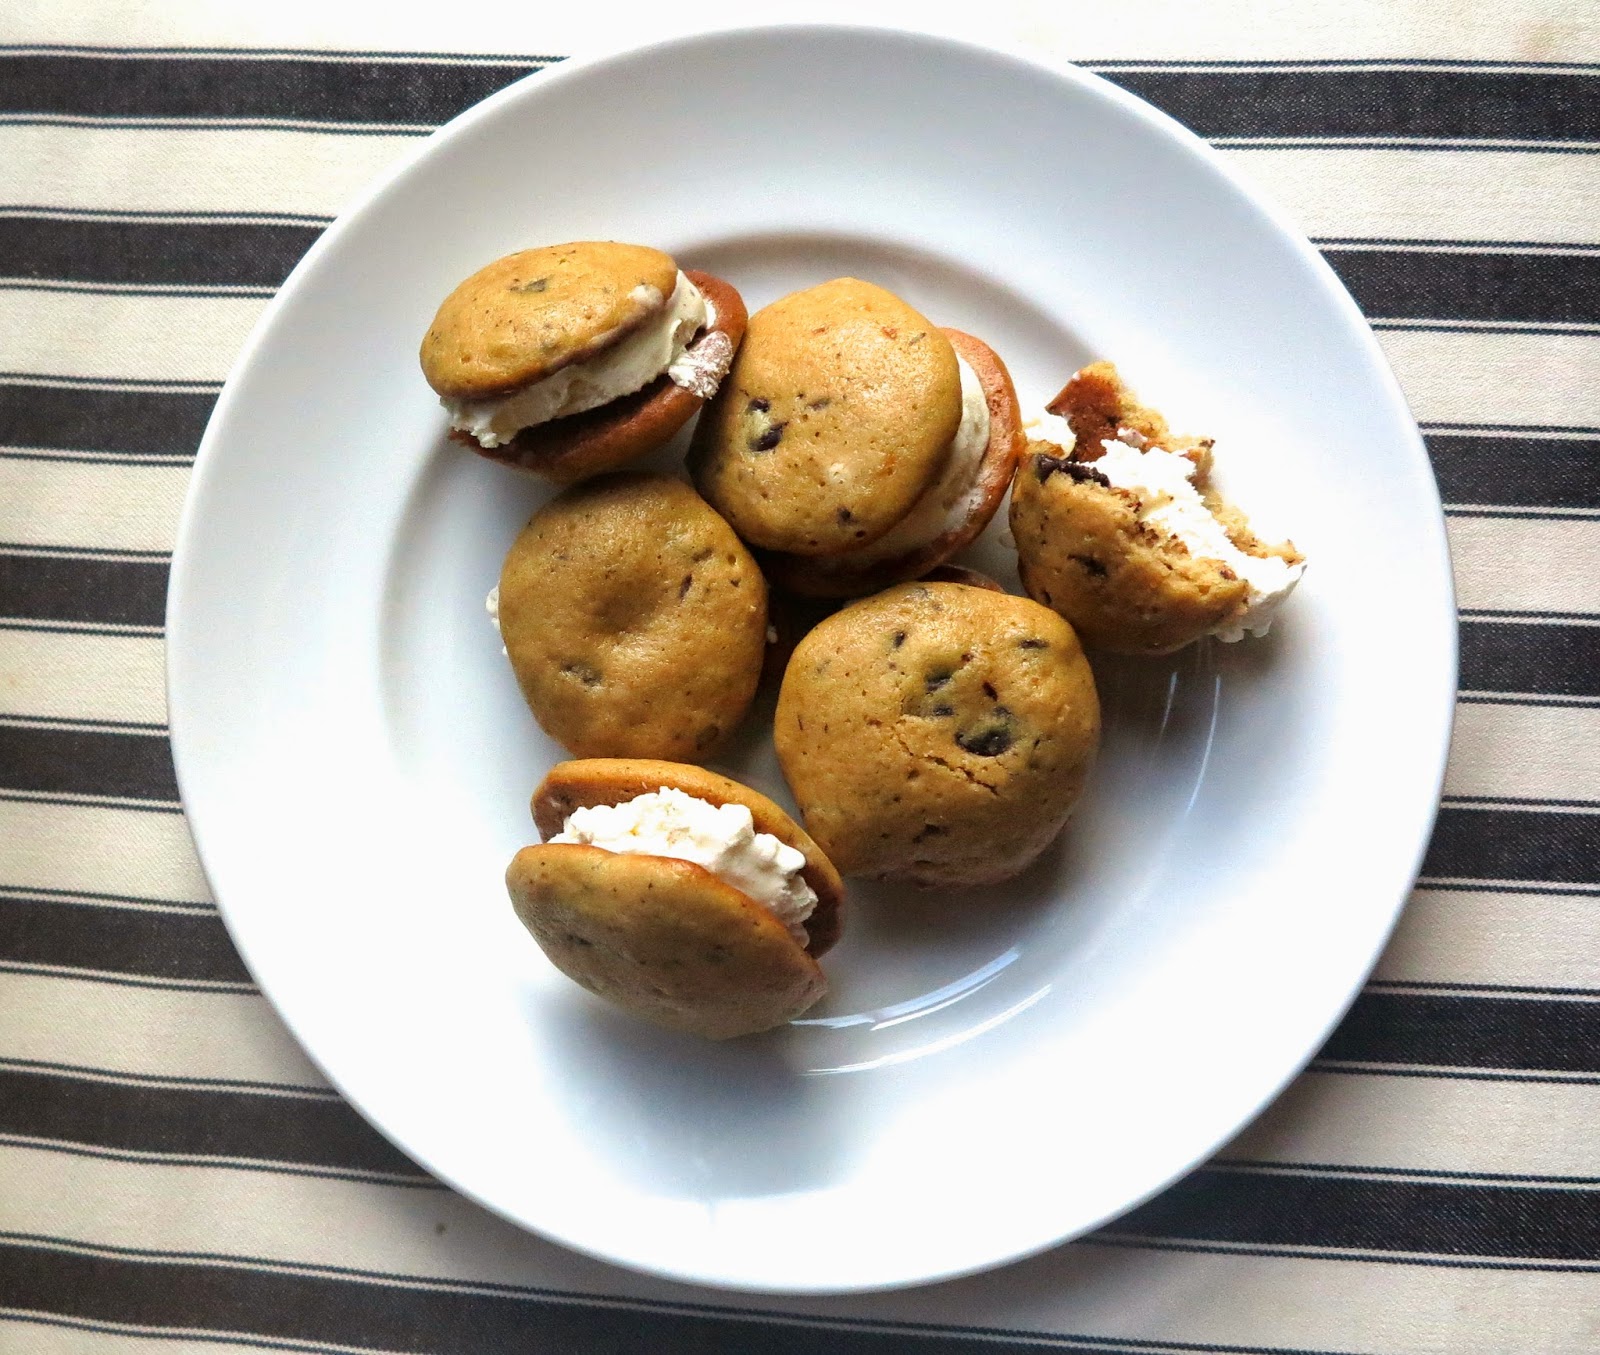
These miniature ice cream sandwiches are inspired by a dessert we had at 121 Restaurant, a beautiful, rustic farm to table restaurant in North Salem. 


My husband ordered the ice cream sandwiches for dessert, which were two MAMMOTH sized ice cream sandwiches. I can't believe it's taken me this long to realize that my husband (who likes everything cold - I find potato chips in the refrigerator - don't ask) would love ice cream sandwiches. And of course, after not having had one for a long time and tasting a bite, my love was renewed. I decided to create a similar, scaled down mini sandwich, just big enough to nip that after dinner "I need something sweet" feeling, but small enough not to destroy your healthy eating resolution! I tinkered with a traditional chocolate chip cookie recipe to optimize the consistency of these cookies with the ice cream - they're a more cake-y cookie. Maybe a mini ice cream whoopie is a more accurate description? The airy texture of these cookies is due to greek yogurt - see here for a substitution chart, and more greek yogurt recipes herehere, and here).

Maybe a mini ice cream whoopie is a more accurate description? 

Mini Ice Cream Sandwiches
makes 10-15 mini sandwiches

Ingredients

1 cup all purpose flour

1/2 tsp baking soda

1/2 tsp kosher salt

4 tbsp butter

1/4 cup full fat or 2% greek yogurt

3/4 cup brown sugar

1 egg

2 tsp vanilla extract

1/2 cup (more or less) dark chocolate chips (roughly chopped, if larger morsels - you could also just use mini chocolate chips)

Directions

1. Preheat oven to 350F

2. Cream butter, yogurt, and sugar together until well combined. Ideally, let the butter come to room temperature. If you're impatient, zap for 20 minutes in the microwave. 

3. Stir in egg, vanilla, baking soda

4. Add flour all at once, and stir to incorporate

5. Stir in chocolate chips

6. Drop by rounded teaspoonfuls onto a nonstick baking sheet. The dough will be very sticky - if this makes you uncomfortable, chill the dough for 20 minutes prior to forming cookies. Otherwise, just power through it. They'll look very small, like this:

For scale, that's a teaspoon to the right - they're small! Don't worry, they'll flatten out (see below)

7. Bake for 5-7 minutes until tops are very slightly golden brown - watch carefully to make sure these little guys don't burn!


8. Remove from oven. Cool for 1 minute and transfer to a cooling rack. Allow cookies to cool to room temperature

9. Remove ice cream from freezer; let sit out at room temperature for 3-5 minutes to soften

10. Use a tablespoonful of ice cream for each sandwich - this can get messy (aka delicious). Feel free to flatten out the edges and squish the cookies together to make the sandwich more seemly. 

11. Store in an airtight container in the freezer. I recommend using wax paper if you're stacking these cookies - their tops are slightly sticky

12. Enjoy! 

I hope you try this delicious mini-sandwiches - let me know how they turn out for you! 

I'm curious - what are some of your favorite summer recipes?

I hope you're enjoying your summer. Thanks for reading! 


-R