Thursday, December 18, 2014

Cranberry Oat Bars


Hello December...except it's almost over. I'm finally sharing these cranberry oat bars, which I made several weeks ago. Buttery and with tart cranberries, they're pretty holiday-appropriate.  I returned from NYC mid-week battling a rather nasty cold, so this will be short.

 I'm looking forward to some down time over the next week. Hopefully, I can muster up the energy to make something new. Now it's off to bed before an early tumor board tomorrow...

Warm wishes, and I hope you are enjoying the holidays!


Cranberry Oat Bars
Recipe adapted from here

Ingredients

Crust:

1 cup all purpose flour

4 tbsp salted butter, melted

1 cup quick cooking or old fashioned oats

1/4 tsp salt

1/4 tsp baking soda

1/4 cup brown sugar

3 tbsp orange juice (or apple cider)


Filling:

1 cup dried cranberries

3/4 cup greek yogurt

1/4 cup granulated sugar

2 tbsp all purpose flour

2 tsp vanilla extract

1 large egg white, lightly beaten


Directions

1. Preheat oven to 325F

2. Combine crust ingredients and mix well; mixture will be crumbly. Reserve 1/2 cup oat mixture in a small bowl

3. Lightly oil a 11x7 inch pan. Press oat mixture firmly into pan.

4. Combine filling ingredients. Spread evenly over crust

5. Top with reserved 1/2 cup of the oat mixture

6. Bake for 40 minutes until edges are golden

7. Cool, cut into squares, and enjoy


These will keep well in the fridge for a week or so. 

Stay warm, and wash your hands.

-R


Sunday, November 23, 2014

Zion National Park


"There are no words that can tell the hidden spirit of the wilderness, that can reveal its mystery, its melancholy and its charm" 

                                                                                -T. Roosevelt

We're enjoying a few days exploring Zion National Park in Southern Utah. There's something about the impartial, colossal red white and cream-swirled cliffs that allow you to just be, to stop worrying. Look at the weathered sandstone, and time stares back at you - millions of years all at once. It's hard to get caught up in the day to day when we're reminded of how small we are in this beautiful place.  It's as if somehow, your mind wanders, expands and fills up the vastness, freeing you from individuality. You cease to be you, you just are, and it's profoundly refreshing. 

Home is a quiet ranch with a resident herd of buffalo, adding to the sense of calm and serenity.  I just wanted to share a bit of the beauty and peace, in hopes that you enjoy it as much as we do.


Returning from the hike to Angel's Landing -  across the narrow cliff ledge in the middle


Our home for a few days:


Thanks for reading. Wishing you a happy Thanksgiving!

-R

Friday, November 14, 2014

Roasted Acorn Squash + Rosemary & Thyme Scented Beef


This recipe is inspired by all the little squirrels outside, with their frenzied collecting of acorns in preparation for winter.  Every time we're out for a walk, you can't miss them, jumping around like they're on some amphetamine-fueled scavenger hunt for nuts. I reluctantly admit that this time of year is ok, but come on, do we really need to get rid of Daylight Savings Time? Isn't this the time we need daylight most?!

In keeping with fall, I've been roasting a lot of apples, squash and pumpkin. There's something warming and satisfying about bringing the outdoors inside; the leaves are a hundred shades of candy-red, orange, and rich brown, mirroring bright red apples, orange squash, and let's not forget - the omnipresent pumpkin pie. Last week, I couldn't resist buying two beautiful dark green acorn squashes with their irreverent stripes of orange, and on a whim, decided to combine them with herb scented beef.  The herbs prompted singing of "parsley sage, rosemary and thyme" on repeat by my husband (Scarborough Fair, I later realized). Also, when presented with the above meal, he instantly homogenized it, smashing the beef into the squash, until it became a squash/beef mash.  It's one of his lovable quirks, the homogenizing. 

 This is a very easy recipe, and you can prepare the squash and beef separately, if you're short on time (I prepped them in two stages). This hearty squash supper is great for a cold fall evening. Hope you'll enjoy this! 


Roasted Acorn Squash + Rosemary & Thyme Scented Beef


Ingredients

2 acorn squashes, halved

olive oil 

brown sugar

cinnamon

nutmeg

1 lb lean ground beef 

1/2 large onion, chopped

1 tbsp minced garlic

Worcestershire sauce

Rosemary & Thyme 


Directions

1. Preheat oven to 400F

2. Halve acorn squashes. Scoop out seeds and brush with olive oil. Dust lightly with brown sugar, cinnamon, and nutmeg

3. Bake for ~40 minutes or until squash is fork tender. Remove from oven and set aside

4. In a medium sized pan, heat a a few tablespoons of olive oil over low-medium heat, with garlic. Once garlic is fragrant, add onions, beef, herbs (liberally), and a dash of Worcestershire sauce. Cook until beef is cooked through

5. Ladle beef into squash halves and serve immediately


What are your favorite fall foods?

Thanks for reading!

-R

Thursday, October 30, 2014

Slow Cooker Meatballs


The days are getting shorter, the weather is getting nippy, and there's just something about this time of year that makes me want to snuggle up at home - and eat hearty food. It's only a matter of time before the Christmas music plays 24/7, and I run out of Pandora hours (think that's impossible? so did I, until my H exhausted my account a few years ago!).
Budget carefully.

Maybe it's the impending cold of winter or the musing that comes with the end of a year, but recently, I've been reflecting on all the wonderful and horrible uncertainties in life that are stark reality when you work in medicine. I've come to wonder: are we all on some sort of weird vacation-of-uncertain-duration on this Earth? And if so, are you making the most of your vacation time, whether that means doing nothing, or doing everything?


Slow Cooker Meatballs


Ingredients

1 lb ground beef (85% lean)

1/4 cup plain bread crumbs

1 egg

1/2 large white onion, finely chopped

1 tsp garlic

3 tbsp oregano (divided - 1 tbsp for the meatballs, 2 tbsp for the sauce)

1/4 cup parmesan cheese + additional for stirring into sauce

1/2 tsp salt

1/2 tsp  pepper

One 28 oz can of crushed or whole tomatoes *

*Use 1 1/2 large cans if you want extra saucy meatballs


Directions

1. Combine all but the tomatoes and reserved oregano in a large bowl and mix until combined

2. Heat olive oil in a large saucepan over medium heat. Form meat into approximately 2 tbsp sized meatballs

3. Brown meatballs evenly in the saucepan

4. Add meatballs to slow cooker. Pour tomatoes + 2 tbsp oregano over the meatballs

5. Set slow cooker to low, cook for 8-10 hours

6. Stir in up to 1/4 cup parmesan cheese to taste; add salt and pepper to taste. Enjoy!


In other news,
New sisters

A visit to the winery 


Mystic Seaport

Thanks for reading!

-R


Tuesday, October 14, 2014

Our Favorite Pumpkin Pie


Since it's officially pumpkin pie season (for us, September through Thanksgiving, and not a day later), I think it's about time I share our favorite pumpkin pie. The season has gotten off to a slow start this year, so we're making up for lost time. And I mean really  moving. We've made this twice in the past two weeks, and each time, it's like....what pumpkin pie?? It's gone before you know it. Even then, I still manage to deplete our whipped cream supply before all the pie is gone. Whipped cream to pie ratio is always low, no matter how good the pie is. Eating whipped cream plain is so worth it, incredulous stares from hubby be damned. 

 I love, love love this pie because it only takes 5 minutes to put together. Pop it in the oven, and an hour later, there you have it: not-too-sweet, sweet, cinnamon-y and clove-y pumpkin pie. The whole room will smell like Fall, and you will want to rake leaves or something. I adapted the recipe from Cooking Light, cutting back on the sugar even further and upping the spice quotient. The pie is still subtly sweet, and going light on sugar helps the spices shine through more. Give this pie a whirl - I hope you love it as much as we do! 


Our Favorite Pumpkin Pie

Ingredients

one 15 oz. can plain pumpkin

one 12 oz can 2% evaporated milk

1/2 cup brown sugar (not packed)

2 large egg whites

1 large egg

2 tsp pumpkin pie spice

1/4 tsp salt

1 pre-made graham cracker crust


Directions

1. Preheat oven to 425F

2. Combine all ingredients in a large bowl. Stir until thoroughly combined

3. Pour into graham cracker crust

4. Bake at 425F for 10 minutes

5. Reduce heat to 350F and bake for additional 40-50 minutes until pie is set and evenly browned 

6. Cool to room temperature & enjoy


I hope you enjoy this pie as much as we do. It's a repeat year after year for us. Let me know how it turns out for you.  As always, thanks for stopping by!

-R


Sunday, October 5, 2014

Spinach Pappardelle with Chard & Italian Sausage


I'm back! We have been traveling the last couple of weekends - to NYC to catch up with a dear friend, and to Boston to celebrate my brother's engagement and to visit my Dad. In between, we've both been pretty consumed with work-related things: abstract deadlines, and thinking about what to do after I finish fellowship this year. It's getting real.  

I should also mention that we blazed through the 14 hour Roosevelt series on PBS - hands down, one of the best documentaries we've seen, and definitely partly to blame for long absence from here.  If you haven't seen the series, or don't even really have an interest in American history that much, watch it anyway. The upbringings and the various psychological hurdles that TR, FDR, and Eleanor had to face are worth it alone, purely from a humanistic aspect. One of my favorite quotes by TR (who essentially spent a lifetime outrunning childhood illness, "depressive tendencies" and awful twists of fate (he lost is mother and young wife on the same day): 

"Get action. Do things; be sane, don't fritter away your time; create, act, take a place wherever you are and be somebody; get action."

You can't beat that. 

We've also been busy planning our vacations for this year - starting with a visit to Zion and Bryce Canyon in November (in combination with Thanksgiving at home). Possibly Australia in March?? Lots and lots of planning - thankfully all for a good things. All of this has meant ultra simple meals (throwing canned salmon into a stir fry, slow cooker chicken galore....), and little energy to document the results. So instead, I'll go back in time a bit. This pappardelle dish is one I've been wanting to share for quite some time now. It popped into my head this morning when the Fall morning cold nipped me in the butt: Swiss chard, a classic winter vegetables. Our spinach pappardelle was a gift from my in-laws. You can probably find it in a lot of specialty pasta / olive oil stores, but if you can't, regular pappardelle should work just fine too. This recipe is so simple, so I'll just leave you with a loose outline here: 

Spinach Pappardelle with Chard & Italian Sausage
makes as much or as little as you like


Ingredients

Pappardelle (spinach or regular)

Italian sausage (a few links, depending on how much you want to make)

Small bunch of swiss chard, chopped

Olive oil

Parmigiano reggiano cheese


Directions

1. Heat a salted pot of water to a boil. Cook pappardelle according to instructions, until al dente. Drain and toss with olive oil.

2. While water is heating, broil or cook sausage until done (I think mine took 15 minutes stove top)

3. Remove sausage from pan and cut into bite sized pieces. Add a bit of olive oil to the pan, return to heat, and add chard. Cook until wilted

4.  Combine pappardelle, sausage, and chard. Top with a dusting of parmigiano and enjoy! 


Thanks for reading - I hope you're enjoying Fall so far! 

-R


Wednesday, September 10, 2014

Basil & Grapefruit Shortbread


Happy unofficial Fall! (It's not really Fall until September 23, but who's counting?) Starbucks clearly isn't, seeing that it debuted its Pumpkin Spice Latte in August this year...?!

In preparation for hibernation, it's time to enjoy some buttery treats. This is an quick shortbread that uses white whole wheat flour. These shortbread cookies are deliciously zesty and light (basil and grapefruit) and substantial (hello butter*) at the same time; they are particularly excellent companions to a steaming mug of coffee or tea.

* reasons why we love organic butter here

Basil & Grapefruit Shortbread
Makes approximately 1.5 doz cookies

Ingredients

Zest of 1 grapefruit (~1 tbsp)

2 tbsp fresh grapefruit juice 

8 tbsp salted organic butter, room temperature

1/4 cup granulated sugar

1 tsp vanilla extract

1/4 tsp salt

1 1/2 cups white whole wheat flour


Directions

1. Preheat oven to 325F

2. Combine grapefruit juice, zest, butter, and sugar in a mixing bowl. Mix on medium speed for 2-3 minutes until well blended

3. Stir in vanilla extract and salt

4. Gently add flour, mixing until just combined (do not over-mix)

5. Roll  dough out into a log; cover and freeze for 15-20 minutes

6. Cut dough into 1/4 inch thick discs; space evenly on a baking sheet

7. Bake for 7-10 minutes or until crisp 

 We have been soaking up the outdoors as much as possible - most recently, we spent a weekend at a beautiful bed and breakfast in the Hudson River Valley over Labor Day Weekend. Although it was an overcast and rainy weekend, we managed to squeeze some kayaking in. There's something so relaxing and peaceful about just being on the water, watching the trains chug by like little model cars, weaving their way around the base of the hills. 


Thanks for stopping by - I hope you're enjoying the beginnings of crisp mornings and cool nights!  

-R


Wednesday, August 27, 2014

Summer Tomato Polenta Tartlets


It's hard to believe it's nearly September - and that it's been 3 weeks since my last post here. We've been so busy the past 3 weekends - between traveling and call - that the time has literally flown by. Last weekend, we were both on call; the weekend before, we made a quick trip to NYC to celebrate my father's hard work. We are so happy for him and so incredibly proud of his accomplishments. 

So, as summer's last hurrah is here, I'm posting this tomato recipe that makes use of the best of the season - fresh tomatoes. This is, like always, very easy to put together. All you need is to cook the polenta (generally 3 cups of water for 1 cup of dry polenta) and slice some tomatoes and basil. That's the extent of the prep work. 

I'm hoping to make these tartlets more time before these pretty bright red orbs give way to the yellow and orange hues of fall squash, although I imagine polenta would be a great partner for fall vegetables too. As a matter of fact, I have a giant kabocha squash sitting on my countertop already. I'm not sure just how to attack it (have you seen kabochas? scary looking things with thick skin...I'll have to ask my Dad, who swears by kabocha almost every morning). I'll report back on the kabocha soon...

Summer Tomato Polenta Tartlets

Ingredients
makes 12 tartlets

1 cup dry polenta

3 cups water

1/2 cup grated pecorino romano cheese

1 tsp salt

1/2 tsp pepper

1/2 pint cherry tomatoes, halved

1 tbsp basil, chopped (plus several more sliced leaves for topping)

crumbled chèvre (or cheese of your choice)


Directions

1. In a medium pot, bring 3 cups of water to a boil over high heat

2. Add polenta gradually while stirring constantly. Turn down heat to medium-low

3. Whisk in grated pecorino, salt, and chopped basil. Continue to stir until polenta thickens to the point where it begins to pull away from the sides of the pot. Adjust seasonings to taste and remove polenta from heat

4. Preheat broiler on low. Lightly oil a standard muffin pan

5. Pour approximately 1/4 cup polenta in each tin. Top with crumbled chèvre (or cheese of your choice) and several tomato halves

6. Broil for approximately 10 minutes, until tomatoes begin to pucker (watch to make sure there's no burning, since broiler heat can vary)

7. Remove tartlets from oven; allow to cool for 10-15 minutes (do not try to scoop them out immediately; they will not hold their shape until they cool down)

8. Remove from the pan, garnish with sliced basil leaves and enjoy!


I hope you have a wonderful Labor Day Weekend. I'm excited for fall (aka pumpkin pie season in this family)!


Wednesday, August 6, 2014

GF Blueberry Oat Bars


O.M.G. (!), this is probably one of my new favorite recipes. On top of being delicious and packed with filling oats, blueberries, and nuts, you can whip this up well before the oven is done preheating. Yes - before the "beep beep beep".  In fact, it's so fast that I've made it in the mornings before work, had a bar for breakfast, and packed 2 bars for an afternoon snack before leaving the house. I've made these gluten free blueberry oat bars at least 2-3 times within the last 2 weeks, and my husband has tried ...zero... (shameful, I know). As I write this, another batch is baking in the oven. I'm hoping he hops on these fast tomorrow morning before they're all gone...

Summer is drawing to a close, but this recipe is great - you can make these filling bars year round. Frozen blueberries bake up perfectly into juicy, blue pillows nestled in a soft, spiced, oat-y background. The hard part is believing that these are actually good for you (and gluten free too, if you please)! 

These blueberry bars are the perfect grab-and-go breakfast/snack; they are essentially portable oatmeal (+ an egg). Protein and fiber in the oats, berries, milk...nuts...egg....wait - everything, will easily keep you satiated until lunch time. 

Blueberry Oat Bars
Makes ~9 bars (3 x 3 in each)
Adapted from Iowa Girl Eats

 Ingredients:

1 1/2 cups oats (quick or old fashioned will work)

1/2 cup chopped nuts (optional)

1 cup fresh or frozen blueberries

1/4 cup brown sugar

1 tsp salt

1 tsp cinnamon

1/2 tsp coriander (optional)

1 1/4 cups whole milk (you could probably also use 2%)

1 egg

2 tsp vanilla


Directions:

1. Preheat oven to 350F. Lightly oil a 12 x 9 in. pan

2. Combine all ingredients but vanilla and milk in a large mixing bowl. Add vanilla and milk last; stir to combine (batter will be very liquid - don't worry, it will firm up in the oven)

3. Pour batter into pan; rearrange blueberries evenly 

4. Bake for 30 minutes

5. Remove from oven; let cool, and cut into squares (approximately 9), and enjoy! 


I hope you enjoy these soft, chewy bars as much as we (okay, just I) have. Store the bars in the refrigerator; they will keep for 3-5 days, but I doubt they'll last that long.

Any suggestions for mix-ins are welcome - I'm thinking about coconut?

Thanks for stopping by! Let me know what you think of these (and what mix-ins you would add)! 

-R

Sunday, August 3, 2014

Mini Ice Cream Sandwiches


Last week, I found out that I passed the Anatomic and Clinical Pathology boards - after all these years of training, I'm finally board certified! This was quickly followed by the humbling realization that although I am now authorized to sign out cases on my own, I still have so much to learn. I have to believe that the first few years when I sign out independently is when I will learn the most. In some ways, this whole process is like learning how to ride a bike. My training wheels are just about coming off....there's no going back! 

My Dad likes to remember how he tricked me into riding my bike without the training wheels. At first I was terrified - I insisted that he stand right behind me as I rode away. He complied the first few times, and then did "phantom steps". He stayed put while I rode away, stomping loudly so I thought he was right behind me. Eventually, I realized he wasn't behind me - and I realized I knew how to ride a bike! Residency is a similar process - although I'm still in the wobbly "I wish I had my wheels" stage. All joking aside though, I am profoundly grateful for the support of my family, friends, and mentors for helping me reach this point. You have helped me through my most difficult times with encouragement and love, and I could not ask for a better group of people to go through life with. 

  To celebrate, my husband took me to  Zinc downtown, which offered a delicious summer dinner with lots of juicy, sweet peaches. It's only a matter of time before we head to our local orchard to nab some peaches of our own! In addition to summer fruits, we've been on an ice cream kick lately - who doesn't love ice cream in the summer? (or fall? or winter? or spring?) 

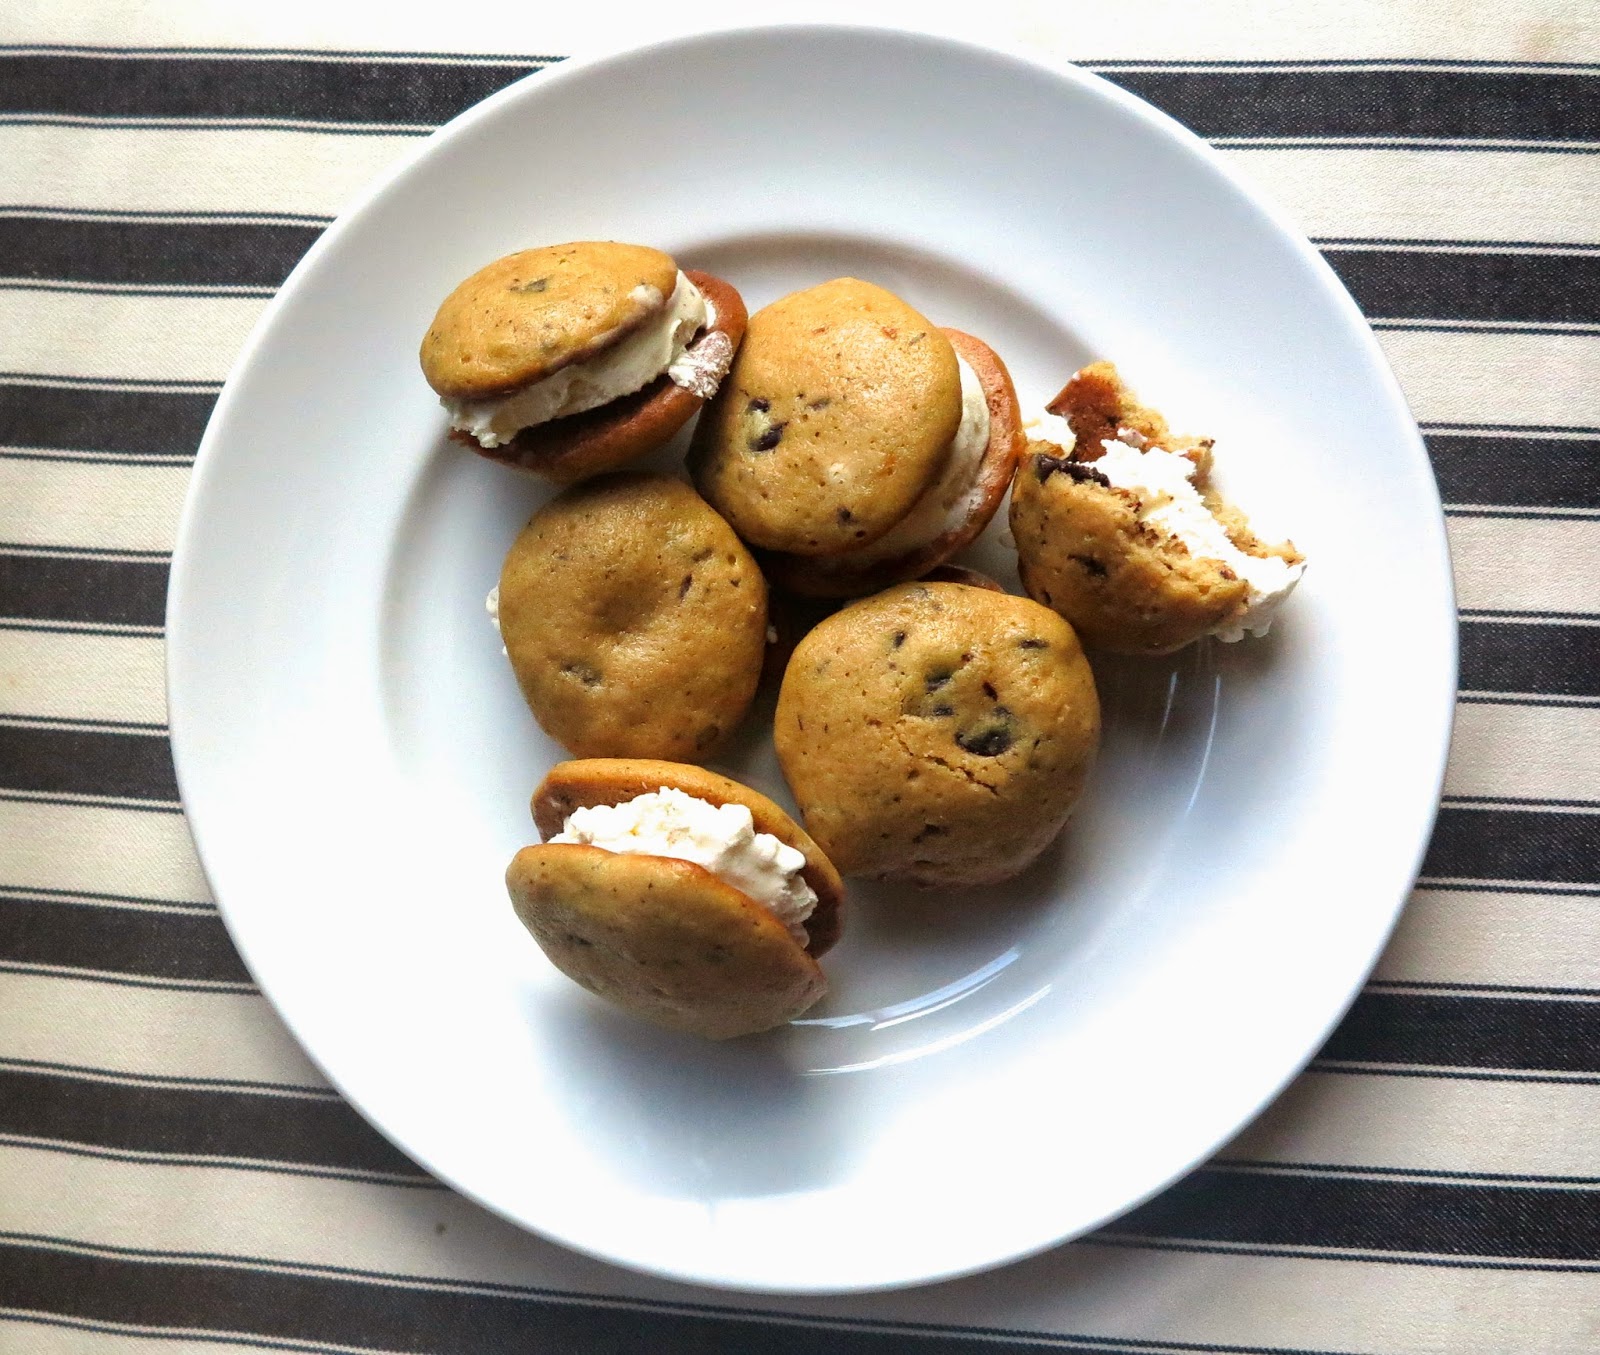
These miniature ice cream sandwiches are inspired by a dessert we had at 121 Restaurant, a beautiful, rustic farm to table restaurant in North Salem. 


My husband ordered the ice cream sandwiches for dessert, which were two MAMMOTH sized ice cream sandwiches. I can't believe it's taken me this long to realize that my husband (who likes everything cold - I find potato chips in the refrigerator - don't ask) would love ice cream sandwiches. And of course, after not having had one for a long time and tasting a bite, my love was renewed. I decided to create a similar, scaled down mini sandwich, just big enough to nip that after dinner "I need something sweet" feeling, but small enough not to destroy your healthy eating resolution! I tinkered with a traditional chocolate chip cookie recipe to optimize the consistency of these cookies with the ice cream - they're a more cake-y cookie. Maybe a mini ice cream whoopie is a more accurate description? The airy texture of these cookies is due to greek yogurt - see here for a substitution chart, and more greek yogurt recipes herehere, and here).

Maybe a mini ice cream whoopie is a more accurate description? 

Mini Ice Cream Sandwiches
makes 10-15 mini sandwiches

Ingredients

1 cup all purpose flour

1/2 tsp baking soda

1/2 tsp kosher salt

4 tbsp butter

1/4 cup full fat or 2% greek yogurt

3/4 cup brown sugar

1 egg

2 tsp vanilla extract

1/2 cup (more or less) dark chocolate chips (roughly chopped, if larger morsels - you could also just use mini chocolate chips)

Directions

1. Preheat oven to 350F

2. Cream butter, yogurt, and sugar together until well combined. Ideally, let the butter come to room temperature. If you're impatient, zap for 20 minutes in the microwave. 

3. Stir in egg, vanilla, baking soda

4. Add flour all at once, and stir to incorporate

5. Stir in chocolate chips

6. Drop by rounded teaspoonfuls onto a nonstick baking sheet. The dough will be very sticky - if this makes you uncomfortable, chill the dough for 20 minutes prior to forming cookies. Otherwise, just power through it. They'll look very small, like this:

For scale, that's a teaspoon to the right - they're small! Don't worry, they'll flatten out (see below)

7. Bake for 5-7 minutes until tops are very slightly golden brown - watch carefully to make sure these little guys don't burn!


8. Remove from oven. Cool for 1 minute and transfer to a cooling rack. Allow cookies to cool to room temperature

9. Remove ice cream from freezer; let sit out at room temperature for 3-5 minutes to soften

10. Use a tablespoonful of ice cream for each sandwich - this can get messy (aka delicious). Feel free to flatten out the edges and squish the cookies together to make the sandwich more seemly. 

11. Store in an airtight container in the freezer. I recommend using wax paper if you're stacking these cookies - their tops are slightly sticky

12. Enjoy! 

I hope you try this delicious mini-sandwiches - let me know how they turn out for you! 

I'm curious - what are some of your favorite summer recipes?

I hope you're enjoying your summer. Thanks for reading! 


-R


Wednesday, July 23, 2014

Spaghetti Squash + Roasted Tomato & Mozzarella


I've been on the hunt for great recipes using tomatoes. After all, it's summer, right? I've had a tendency in the past to buy boxes of cherry tomatoes, only to forget about them, finding them wrinkly and moldy (gross) in the back of the fridge weeks later. Not this time. 

I'm settling comfortably into fellowship and really starting to get into the groove of things. My husband is on a somewhat less friendly schedule, in the surgical intensive care unit. It's funny how easily we have gotten used to him not having to take in-house, overnight calls (thanks to a night hospitalist team). Now, he has to take in-house call once a week for this month - and it's like, say whaaa???

Despite the fact that my fellowship hours are very lifestyle friendly, the summer heat is making me sluggish...and less apt to turn on the oven. So when I came across this recipe calling for roasting tomatoes at 400F for 20 minutes, my first thought was "no way - I'm going to broil these in half the time". It worked. Yes, I know - broiling on low heat is also 400F, but I'm impatient. And in the dead of July, just the thought of cooking by convection is painful. Plus, I hate having to wait for the oven to beep when it's done preheating. I know it's not right, but sometimes I just shove everything in there before it's officially preheated. Ok, you get my drift.

I like this recipe because although it requires a few steps, you don't have to do them all at once. I accomplished this by roasting the squash one night (along with some sweet potatoes). That night, I shredded the squash and kept it in the fridge. The next day after work, I quickly broiled the tomatoes, threw everything together, and had a delicious, healthy bowl of veggies ready for dinner. Even my husband (who often protests "too many veggies!!!") liked this one. I already knew he was keen on spaghetti squash, so with the addition of some pizza-esque flavors (tomatoes, basil, mozzarella), failure was almost impossible. In fact, I'm pretty sure if I put tomatoes, basil, and mozzarella on...I don't know, say - a piece of celery, he would somehow find it delicious. 

I also like this recipe, because I'm fairly certain my Dad would love it too (right Dad?). I definitely inherited my food preferences from him, because we share a strong preference for healthy fruits and vegetables, especially starchy ones (sweet potatoes, and his all time favorite: kabocha squash). That, and a love of all things sweet - especially carrot cake.

Back to the healthy stuff:

Spaghetti Squash + Roasted Tomato & Mozzarella 
Adapted from Midwest Living

Makes approximately 2 cups & serves 2 (you will have plenty of leftover squash)


Ingredients:

One 2 lb spaghetti squash, halved and seeded

Olive oil

Salt and pepper

Salted butter, approx 1 tbsp

1 pint cherry tomatoes

Oregano

One 8 oz container of cherry sized mozzarella balls

Handful of basil leaves, roughly chopped

Pecorino romano (optional)

Directions:

1. Preheat oven to 375F. Brush squash halves with olive oil, and roast for 30-40 minutes until tender. Remove from oven, cool, and shred squash

2. While squash cooks, brush cherry tomatoes with olive oil and season with salt, pepper, and oregano. If completing this the same day as the squash, you can simply bake the tomatoes for 20 minutes alongside the squash. If on a different day, set broiler on low and broil for 10 minutes until tomato skins are just starting to split


3. Remove tomatoes from under the broiler; gently press down on tomatoes to release their juices (careful, they will squirt)

4. Mix 2 cups of spaghetti squash (reheat if necessary) with 1 tbsp butter. Then toss in tomatoes and mozzarella (top with as few or as many mozzarella balls as you like. Since they come refrigerated, you may need to heat them up slightly before you add them to your dish).

5. Season with more oregano, salt, and pepper to taste. Top with chopped basil leaves, a dusting of pecorino cheese (optional), and serve

You will have several cups of leftover shredded spaghetti squash - I enjoyed mine the next day with some butter, herbs, edamame, and pecorino (ran out of tomatoes, but was still delicious).

Thanks for stopping by. Hope you enjoy this easy, beautiful squash recipe! Let me know how it turns out for you.

-R

I'd love to connect with you! Join me on Facebook.


Wednesday, July 16, 2014

Edamame Guacamole

Have you been to the Whole Foods Market blog? They have some great recipes...and this is one of them. Lately I've been on an edamame kick - usually, I add them in my salad at lunch. I love the nutty flavor and texture, plus more importantly - they're a great source of protein and fiber, which keeps me full.

We are really trying to incorporate more fruits and veggies into our meals (well, who isn't these days?) We're having a good go at it, although there are times when fellowship schedules are less than conducive.  When time permits, I methodically plan out our grocery shopping list, cook over the weekend, and plan meals for the week. Of course, as we all know, there are other weekends: weekends on call, or weekends out of town, or too-tired weekends that simply do not lend themselves to meticulous planning and cooking. 

That's why I'm always on the lookout for an easy, healthy recipe that's downright unfussy. This edamame guacamole fit the bill. I almost never buy fresh edamame pods; I prefer the frozen beans, so I can have a permanent stash in the freezer. Avocados are a little bit less robust than frozen beans, but they keep pretty well in the fridge. 

This guacamole takes about 5 minutes to make, and roughly chopping some onion is all the prep work you'll need to do. It has the familiar rich and creamy taste of avocado guacamole, but it feels a little more solid with the edamame. This dip will fill you up - no surprise, since it's packed full of healthy fats, protein, and fiber. We enjoyed ours as part of a light vegetarian meal. If you love edamame, try this one out! 

Edamame Guacamole
adapted from the Whole Foods Market blog

Ingredients

1 small avocado

1 cup frozen shelled edamame, thawed

1/4 white onion, roughly chopped

cilantro (optional)

juice of 1 lime


Directions

Put edamame, avocado, cilantro, onion, and lime juice in a food processor. Blend until smooth. Serve with crudités. 


This is really the perfect 5 minute recipe for these hot, humid mid-summer days, when the last thing you want to do is turn on a stove! Thanks for stopping by, and hope you are staying cool!

-R

I'd love to connect with you! Join me on Facebook.


Tuesday, July 8, 2014

Big Sodas are back...

I was sad to learn that New York's ban on big sodas was rejected by the NY State Court of Appeals last week. Yes, it's a little bit paternalistic. Yes, it's not perfect - milkshakes and juices were not restricted, for example, nor were certain locations like convenience stores. Yes, people could just buy 3 small drinks instead of 1 large drink. But you know what? There's clearly no panacea for the obesity epidemic in this country, and I think this was one small step in the right direction.

As far as people complaining about having their personal rights infringed upon, there's nothing stopping anyone from buying 2 smaller sodas (or walking across the street to an "unrestricted" location). The ban would no doubt have been an inconvenience for some, but a potential benefit for the larger populace. I would liken the city's efforts to reduce massive overconsumption of processed food in this country to an individual trying to lose weight by simply not keeping certain foods in the house.  If we can't control ourselves (myself included - there's a reason why I don't buy Oreos...), I'm ok with the government stepping in a little bit to help. I know not everyone agrees with the ban, but I was really rooting for it! What do you think? Leave a comment!

Thanks for reading,

-R

I'd love to connect with you! Join me on Facebook.

Sunday, June 29, 2014

Creamy Bacon & Pea Orzo


Hi guys, I've been meaning to share this for awhile, but I've been in a strange limbo between the end of residency and the start of fellowship. The days of summer break are far gone,  but these past couple of weeks have been the closest thing we've had to those beautiful, uninterrupted 3-4 month stretches of break. I'll take it! 

We just had a wonderful weekend in Boston with my Dad, brother, and his girlfriend. It's these kinds of gatherings - plenty of good conversation and laid back lounging, that recharge us. I only wish we could all get together more often!

I was inspired to make this when I came across some spring pea recipes a few months ago. There's something about the bright green leaves on trees that makes me want to eat something that looks just as pretty and fresh. This rich pasta is such a great comfort food - loaded with veggies and a little bit of indulgence with bacon. It is of course, easy and quick to make. While the orzo cooks, simply prepare the sauce, and within 10-15 minutes, you'll be tossing the finished product together. If you want to make a double batch, I'm confident that this would freeze well and make for an effortless weeknight dinner down the line. 

Creamy Bacon & Pea Orzo
Yields approximately 3-4 cups


Ingredients:

1 cup orzo (uncooked)

3 cups water

4-5 strips bacon

1 cup frozen peas

1 large shallot or 1/2 white onion, diced

Parmesan cheese

Truffle oil (optional)

1 1/4 cups whole milk


Directions:

1. Bring 3 cups of water to a boil in a medium sized pot. Add orzo and cook until al dente (approximately 5-7 minutes)

2. Fry bacon in a medium saucepan until crisp. Remove bacon strips from pan, chop roughly into small pieces

3. Cook shallot/onion in the pan with bacon fat for ~1 minute

4. Return bacon to pan, adding whole milk and frozen peas. Simmer until slightly thickened, approximately 5-10 minutes; see below for desired consistency. Season with salt and pepper to taste


5. Once orzo is cooked, remove it from the pot and drain

6. In  a large serving bowl, combine orzo and cream sauce; toss to combine thoroughly

7. Top with grated parmesan cheese and serve immediately

I topped ours with a light drizzle of truffle oil - it was delicious! The truffle oil is completely optional - a simple dusting of parmesan is more than enough to bring everything together into a savory mouthful punctuated by the sweetness of peas. I hope you'll enjoy this easy pasta dish - thanks for reading!

-R

I'd love to connect with you! Join me on Facebook

Monday, June 16, 2014

The Big Island - Part II

We've been back in the States for about a week now. It's always weird making the transition back to work when you've been on vacation for several days, but I think I've snapped back to reality. Being on frozens shortly after our return certainly  helped rip me out of any lingering jet lag. I just wanted to share some of our favorites from the rest of our trip: 

Kula Kai Caverns: Located in the southwestern portion of the island, these caves are really a labyrinth of underground lava tubes that extend for approximately 30 miles. We descended into the caves and explored them for 2 hours with our guide Gary, who was so much fun and taught us so much about the history of the area and the native populations who used these caves for water collection, cooking, etc. We marveled at the adaptability of life when we saw ohia tree roots in the caves - truly amazing how living things will find a way to flourish anywhere, even on a desolate lava field! 

Entrance to the caves
Top left: Ohia tree roots, which grow straight through the ground into the cave, subsisting off of damp air 

Crawled through this narrow tunnel! 


Honu (sea turtle) napping on Punaluu beach 

Drive down to South Point 

We learned from our cave tour that the southwestern portion of the island has been very arid since 2008, when the crater floor of Kilauea (the active volcano) collapsed. Previously, the floor had been acting as a sort of filter for volcanic gases, but with its collapse, many more gases were released into the air, eventually affecting precipitation. As a result, this part of the island is actually under drought conditions. With the rolling grasslands and windswept fields, you could easily mistake this for part of the Midwest (until you see the ocean in the distance).

Mare and foal

Peace and quiet on the way to Naalehu
 Waipio Valley: We almost missed the short hike into this valley. We're glad we didn't. On the drive from Kona to Waipio Valley, we drove through Waimea, which is Hawaiian paniolo (cowboy) country. There were lush, green pastures and some very happy looking cows. When we arrived at Waipio valley and hiked down to the valley, we were rewarded with almost complete solitude on a pristine black sand beach surrounded by towering green cliffs. It was marvelous...and for reasons unknown to us, a local dog volunteered himself as our tour guide. He casually strolled a few steps ahead, patiently waiting for us to make the steep descent into the valley. If you're ever visiting the Big Island, do this hike on a weekday, and you'll likely have the place to yourself. It used to be a retreat for Hawaiian royalty, and today is a secluded, quiet farming area (lots of taro). We spotted a wild horse roaming.
Waipio Valley from above
Our guide dog

 We spent a lot of the latter half of our vacation doing water sports -  kayaking to sea caves, and an unforgettable snorkeling tour on a retired Navy Seal vessel, where we snorkeled with manta rays and spotted some dolphins. Seeing manta rays beneath us was surreal....they're so big and look like they're flying lazily underwater. If you're on the Big Island, I would highly recommend Wild Hawaiian Ocean Adventures. All of our snorkeling memories are on our GoPro camera, so I won't be able to share them here.

We spent the last few days of our vacation visiting some of the top beaches in the area. 


We enjoyed this beautiful sunset on our last evening in Hawaii. After that, it was a grueling 10+ hour flight back home. We are so thankful that we were able to take this refreshing trip together. Now we're re-energized and ready to tackle the next years of fellowship! 

Thanks for reading. I hope you've enjoyed some of the beauty we shared! 

-R

I'd love to connect with you! Join me on Facebook